Accessing the Environment via Terminal
Here are some steps to get your started on a Windows machine:
- To access the environment from a Windows machine, you will need an SSH client. We would recommend MobaXterm, and we will be using it in our tutorial examples
- Once you have installed MobaXterm, start it up
- From the Session menu, select New Session
- Select SSH from the top left
- For the remote host, use this format <computecanadausername>@trillium.scinet.utoronto.ca, substituting in your Compute Canada account username. For example, doej@trillium.scinet.utoronto.ca
- Click on the Advanced SSH settings tab below
- For SSH-browser type, select SCP (enhanced speed)
- Put a checkmark next to Use private key. Click on the blue page icon to browse to the private key you setup when creating your public key for your Compute Canada account
- Then click on OK to connect
- Enter in your Compute Canada account password
- You are now connected to the server
- To log out, type
exitand press Enter. Then press Enter again to close the tab
And the same steps, on a Mac:
- You do not need to install any programs or clients to access the environment from a Mac. Access is via Terminal.
- You will use an SSH key to connect. This requires some initial configuration, but once this is done it is both more secure and more convenient. If you have not already generated a key pair, instructions on how to do so can be found here. More detailed instructions are also available on the SciNet wiki. Remember, you’ll need create a key-pair on any systems you intend to connect with!
- To login to the remote host, use this command in Terminal:
ssh -i .ssh/myprivatekeyname <computercanadausername>@trillium.scinet.utoronto.ca. The system will prompt you to enter the passphrase for your key (Note,-i .ssh/myprivatekeynameis only necessary if you are not using the default key filepath and filename. See complete SSH setup instructions here for more information). - You are now connected to the server
- To log out, type
exitand press Enter. You are now back in your local environment.
Querying the Datasets
All six datasets are in Apache Parquet format. This is a tabular datatype, similar to an Excel CSV file, but one that is capable of handling much larger files. Parquet files are binary, columnar files that are designed for reading and writing extremely large datasets, have built in compression and are optimized for analytics. For these reasons, these files can’t be opened or manually inspected by humans. They need to be worked with using big data tools.
Each dataset / directory is composed of many parquet files, up to 11000 per folder. Company reference data provides for a unique identifier across most datasets in the form of a unique company ID, allowing for querying across directories.
Important Note: These files are read only. Although they can be queried and explored, new copies or subsets will need to be created during analysis.
- You will need to use Linux/UNIX command line in order to navigate the environment. Once logged into SciNet, navigate to the following folder using the cd command to change the current directory:
cd /project/restricted/mdl/revelio Type
lsto view a list of all folders inside the directory. You can then use thecdcommand to navigate to an individual directory. For example,cd academic_layoff

- Please note: some products contain multiple folders. For example, there are three folders related to the job postings dataset: academic_postings_indeed_individual, academic_postings_linkedin_individual and academic_postings_unified_individual. Please see the vendor documentation if the contents of each folder are unclear. Otherwise, contact us for additional support.
- Please also note: The academic_ prefix does not represent that the data refers only to academic institutions or research centres. The data is comprehensive across employment fields and segments. This denotes only that the data was purchased for academic use.
- You will need to use big data tools to work with this data. If working with python, PyArrow + Pandas provide excellent support for querying and analyzing parquet files. You can read more about working with PyArrow and Pandas via their oline documentation. Please note that there are other libraries and tools for working with these files. If you’ve like to explore other options, this guide is an excellent place to start.
- Note: Queries and code run on the login node are for testing purposes only. Once you have compiled and tested your code or workflow on the Trillium login nodes, you will need to submit it as a job to be run on the compute node. Any lengthy process being run on the login node will be automatically stopped.
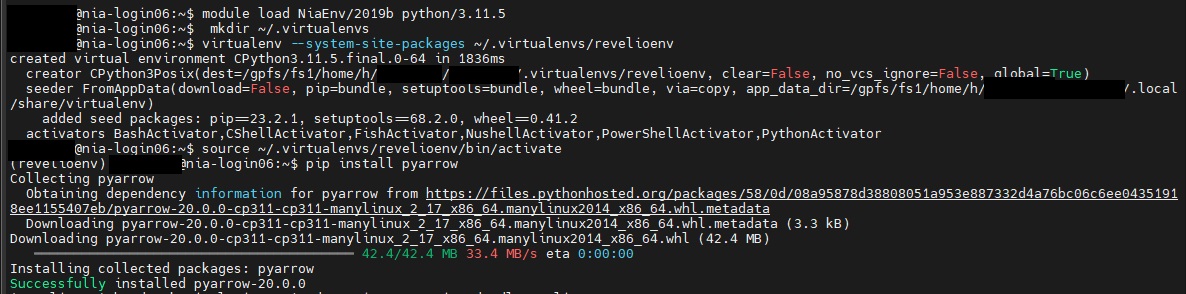
- If using Python, you will need to load a python module into your environment. SciNet provides excellent documentation on this. Note that Python 3.11.5 has been installed as a default module and does come pre-loaded with many useful packages including Pandas. However, as PyArrow is not part of this, you will need to follow the steps outlined by Scinet to set up a virtual environment in order to install PyArrow or other packages as needed. See below for screenshots of an example creationg of a new environment, revelioenv , as well as the activation of that enviromment and installation of Pyarrow. This follows the SciNet instructions linked above:
- Type
module load pythonin order to load the default Python module. - Next type
mkdir ~/.virtualenvto create a directory in your environment to store your new virtual environment - Next type
virtualenv --system-site-packages ~/.virtualenv/[myenvironmentname]envto create your new environment. - Next type
module load gcc arrowto activate the pyarrow engine. This must be done before activating your new virtual environment and installing pyarrow . - Next type
source ~/.virtualenv/[myenvironmentname]env/bin/activateto activate your environment. The name of your environment should now appear to the far left of your screen. - Finally type
pip install pyarrowto install the pyarrow module. There is no need to install pandas as this is one of the default packages.
- Note: You can install as many modules as needed. You’ll need to activate this environment every time you log in, and at the start of all your jobs scripts. However, the creation of then environment and installation of packages only needs to be done once. The next time you log in, you can skip steps A > C above and simply type steps D & E:
module load gcc arrowsource ~/.virtualenv/[myenvironmentname]env/bin/activate
- Note: You can install as many modules as needed. You’ll need to activate this environment every time you log in, and at the start of all your jobs scripts. However, the creation of then environment and installation of packages only needs to be done once. The next time you log in, you can skip steps A > C above and simply type steps D & E:
- Type
- Once you have compiled and tested your script on a smaller subset of the data within the login node, you will need to submit it as a job to be run on one of SciNet’s compute nodes, per SciNet’s instructions. These instructions also include example submission scripts. The output will be written to your $SCRATCH directory.
- If you would prefer to use a different language to query the data, please see the relevant documentation on SciNet’s website. For example, Parquet files can also be queried using C++ or Java.
Technique: Quantitative Data Analysis